Secure ways to pay at checkoutPay in 4 interest-free payments of $14.00 with Learn More4 interest-free instalments of $14.00 (excluding shipping) by AfterPayFrom $10/week with Zip
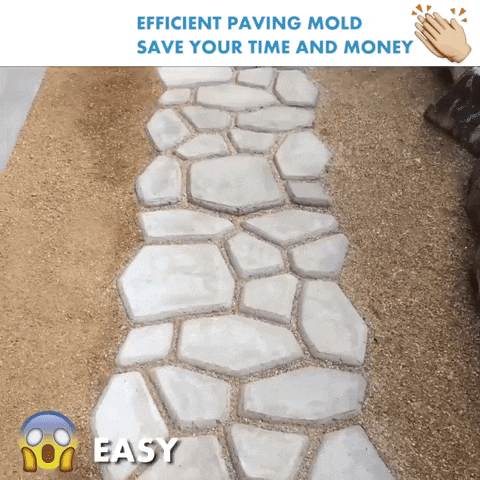
LET YOUR GARDEN PATH HAVE A BEAUTIFUL PATTERN SO THAT THE ROAD IS NO LONGER RIGID!
You can make a cement garden path in flawless patterns, smooth surface & even filling with these molds. Everything can be easily done - Just fill the mold with a concrete, smooth surface, and remove mold and you're done!
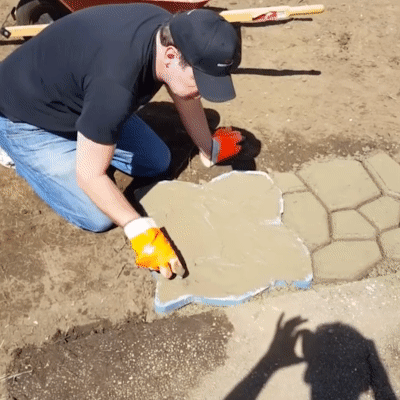
DIY Path Floor Mould Maker is a paving mold used to make a cement (or red mud) garden path. Let your garden path have a beautiful pattern so that the road is no longer rigid.
Path Floor Mould is a paving mold used to make a cement (or red mud) garden path. It consists of irregular holes, which can fill the cement slurry in the mold, and then smooth the upper part by hand. When dry, take out the loading mold and sprinkle the stone sand (or plant the grass) in the gap.
FEATURES:
Suitable for gardens, meadows, balconies, villas and more.
Easy to Use: No special skills required. Just put the cement into the mold.
It can be used repeatedly or multiple times at the same time until all the roads have been completed.
Easy to Clean: Just take out the mold before the concrete is solidified and clean it with water, it can be reused next time.
It is possible to make roads of different colors, and it is only necessary to blend the cement inside into colored, without expensive equipment and laying costs. Save money, convenience, beauty, and practicality.
DIY Your Garden NOW!: This mold is designed for the garden-lovers, who want to create their own design decoration to make their gardens more beautiful. To give your pavement and yards some artistic sense.
SPECIFICATIONS:
Material: Plastic
Sizes:
A: 30 x 30 CM
B: 40 x 40 CM
C: 36 x 36 CM
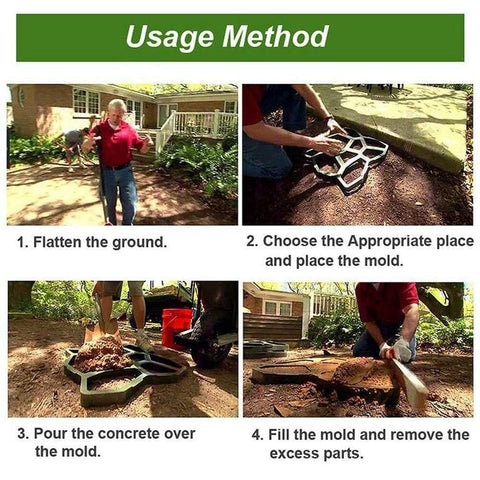
HOW TO USE TO BUILD THE PATHWAYS
Step 1: Mix cement with water, according to package directions. When ready to use, the concrete will be the consistency of oatmeal and thick enough to hold an edge when you slice into it with a shovel.
Step 2: Fill the paver mold, scooping the concrete in with a shovel and making sure to fill each area.
Step 3: Using rubber gloves, spread the concrete around the mold, filling in any gaps or low points. Tap the mold with your hand to eliminate any air bubbles.
Step 4: Following the contours of the mold, smooth out the concrete, wiping away any excess.
Step 5: Allow the concrete to set for a maximum of five minutes, then carefully remove the mold. For the next stretch, rotate the mold a quarter-turn and place it beside the paver just completed, angling slightly if you're creating a curving pathway.
Step 6: After letting the concrete cure overnight, fill the cracks with dirt and wash away any excess. Wet the ground around the newly formed pavers to help them settle.
Shipping Details
Delivery varies by location, please see the expected timeframe to receive your product below:
Metro: 1-4 business days
Regional: 1-6 business days
If you are unavailable at the time of delivery re-delivery fees may apply.
We provide a 14 days return period
We also honour change-of-mind returns
Please make sure the items are in their original condition.
,gravity=Center,allowExpansion)
,gravity=Center,allowExpansion)
,gravity=Center,allowExpansion)
,gravity=Center,allowExpansion)
,gravity=Center,allowExpansion)
,gravity=Center,allowExpansion)